Sunday, September 14, 2014

Another BDay Layout

Hello crafty friends,

I had a nice relaxing Saturday in my craft room where I created two layouts.  The first layout has a large (6x8) photo of Peter just after desert arrived at our table on his birthday.


My journalling says... Thursday, 9-4-2014, a normal weekday made extra special because it's your BDAY!  Dinner at Red Robin.   For his real birthday meal he asked for Texas De Brazil, an expensive all you can eat Brazilian steakhouse, which we took him to the following Saturday :)

On this layout I used a sheet of birthday text pattern paper from the Pebbles Birthday Wishes 12x12 pad Wendy Antenucci sent me.  I used the Die-Versions Happy Birthday Solo Sentiment die, which is truly my favorite birthday die and the Wee Petite Super Stars die.  I also used the Quickutz Nesting Balloons dies.  

My second layout of the day was this one...


Rusty has been a member of our family since January 2014.  He turns 1 in November.  We had cats before and they were great cats, but Rusty is an awesome cat.  We are so very lucky to have him in our family.  His foster family had five kids and they must have held him all the time, because he loves to be held and to be near people.

My Journalling  says... You are such a great cat.  You love to be held.  Most nights you sleep in our bed between our pillows, but after we fall asleep.   You love pencils and will go crazy until you get them on the floor.  You are a little swiper and love to steal my earrings.  I'm excited to see how you handle xmas and all our xmas trees.

Here's a cute photo of Rusty keeping me company while I scrapbook this layout :)


I printed photos for three layouts, but didn't get to the 3rd one yet.  Hoping to work on it tonight. Until next time, take care.
Monday, September 1, 2014

BDay Party Layout

Hello crafty friends,

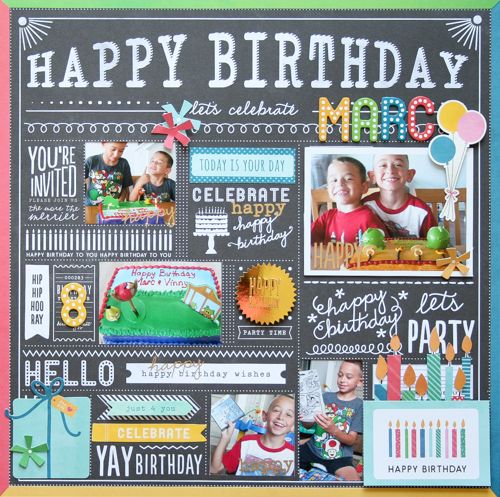
My baby boy will turn 14 in a few days.  We had a family party on Saturday for him.   I took Thursday and Friday off, which I used to get ready for the party.  I used Sunday, to recover from the party (I don't really like parties).   Today I got up and went right into my craft room.  I was on a mission to scrapbook.

Honestly, it's been a while since I've been in the frame of mind to scrapbook.  Kind of lost my mojo there for a while and I'm not sure I have it back.   But with a handful of newly printed (kudos to my new printer) birthday photos.  I pulled out the Pebbles Birthday Wishes 12x12 paper pad Wendy Antenucci sent me a while ago.   Was it really back in June?  WOW!  This summer has just flown bye me. 

Those who know me, know I love pattern paper and I love designs with text.  When I saw Wendy's layout on the Pebbles blog a while ago, I fell completely in LOVE and asked for a tutorial, which she very kindly gave us on June 23rd (here).  I still love Wendy's original layout with all the color and embellishments she added.  My plan was to copy (scrap lift) her layout, but when I sat down, I ended up going in a different direction.  

Here's a photo of Wendy's original layout:


Here's my layout:


I think it's a teen friendly layout  and I'm happy with how it turned out... although I just noticed that I didn't include his age, so I'll have to find a place to insert that important piece of info.    

Thanks for stopping bye.  Stay tune for more bday layouts in the coming weeks.  

Sunday, August 31, 2014

LOL

Every BDAY party needs one of these guys...


Die Cuttting & Baking

Yes,

I did some baking this weekend.  I made some cookies and a large pan of brownie cake for my son Peter's 14th bday party on Saturday.   And guess what, when it came time to decorate the brownie cake, I went into my craft room and pulled out one of my favorite birthday die.  The Solo Sentiments - Happy Birthday die.

Before I show you how I added die cuts to the brownie cake, let me back up and give you a little back story.  While in the baking section, looking for candles and inspiration that were "boy like" and "teenage like", I found sugar sheets like this one in a couple of colors.   I was excited and right away I was thinking of my favorite big bold birthday die, so I picked up the gold one and walked out of the store a happy Mom :)


I cut the sugar sheet in half, so I was working w/two 6"x8.5" pieces, which gave me 4 Happy Birthday die cuts.
I instructions said to remove the sugar paper from the plastic backing, but I ended up not doing this.  I kept the sugar sheet on it's plastic backing when I cut the sheet in half and when I made my die cuts.  The plastic backing did not die cut.
Noticed how the sugar paper die cut stayed within the die. Trust me it wasn't stuck.  It was super easy to lifted a corner and pulled the die cut out.

I was able to die cut four, which I placed (at Pete's request) on each corner.


LOVE how it turned out.  I'm so going to do this again.  I'm picturing a two maybe three layer cake with white frosting and these same die cuts in different colors all the way around the cake :)

Now, it's out of the kitchen and back into my craft room to scrapbook some of the bday party photos! Until next time... take care.

Friday, August 15, 2014

Die-Versions/Sparkle N Sprinkle Blog Hop

Welcome to the Die-Versions and Sparkle N Sprinkle Blog Hop!

The joint blog hop with Die-Versions and Sparkle N Sprinkle begins today (7am EST) and goes until Aug 17th (5pm EST), so there will be plenty of time to check out all the great projects created by both teams. The theme is Christmas, so you'll get lots of great inspiration for your upcoming Holiday cards.

Die-Versions manufactures low profile dies made right here in the United States and Sparkle N Sprinkle manufactures rubber stamps, glitters, embossing powders, and flocking, also made in the US. This is like a match made in heaven - low profile dies combined with lots of bling! Doesn't get much better than that.

One winner will receive a Grand Prize consisting of a $50 gift certificate from Die-Versions and a $50 gift certificate from Sparkle N Sprinkle, for a total of $100. The winner will be announced on Aug 17th on both the DV Blog and the SNS Blog as well as their Facebook pages.

In order to be eligible for the Grand Prize, please:
• Leave a comment on each Designer's blog
• Follow both companies on Facebook (DV Facebook page; SNS Facebook page) if you haven't already so you can keep up to date on all the latest goings on. (I'm sure that all of the Designers would love for you to follow them too, but that isn't a requirement to win this prize.)

You should have arrived here from Eret's blog. If not, then you should begin at the Die-Versions Blog and end at the Sparkle N Sprinkle Blog. If you get lost along the way, you can go to either the DV Blog or the SNS Blog to see the complete list of participants.

We'd love it if you'd like to leave a comment at either the DV Blog or the SNS Blog telling us which projects were your favorites. :-)


Now that we got all the official rules out of the way, lets have some fun :)

As you probably know by now, the Die-Versions Designers received the same set of supplies from Sparkle N Sprinkle. Here's a photo ...


Using the Die-Versions Whispers - Seasons Greeting Script die, Sparkle N Sprinkle Pine Forest Stamp and Cloud Nine white glitter I created this card.

I started by stamping the pine trees twice, side-by-side on a piece of white smooth card stock.  I fussy cut around the tops of the pine trees and colored the white trim with a copic maker. Next I added glue and the Cloud Nine white glitter everywhere I wanted "snow".  I set this aside to dry.

I took a plain white card base (5"x6.5") and covered the front with a piece of blue "snowy" pattern paper from the Polka Dot Party paper pad by American Crafts. Next I die cut the Whispers - Seasons Greeting Script die from sliver glitter paper.

Once I had all my components, I adhered my stamped pine tree element at the bottom of the card and trimmed the access.  Finally, I adhered the season's greeting die cute and my card was done.


I wanted to show the versatility of the Pine Forest Stamp, so I created this other quick card, this time using the pine tree as bushes on either side of my winter cabin door :)


We hope you enjoy this blog hop and it gives you lots of inspiration!  Don't forget to leave each of us a comment and follow both Die-Versions and Sparkle N Sprinkle on Facebook.  Your next stop on the blog hop is Irit.

Sunday, July 20, 2014

Crafty Sundays

I love spending Sundays in my craft room playing with my stuff.

I currently working on Die-Versions design team projects featuring the Christmas release dies. 32 dies were release, so prepare yourself for lots of wonderful projects from all the designers in the coming days.

I'll also be working on projects for Die-Versions' blog hop with Sparkle N Sprinkle on Aug 15th - Aug 17th.  I just received my package of goodies from them... here's a picture:


Doesn't all the sparkle make you smile?  It makes me smile and I can't wait to start playing with all the goodies.  Come back Aug 15th - Aug 17th to see what I end up making with all this sparkle magic.

Until next time...

Friday, July 4, 2014

Happy 4th of July Crafty Friends!

I made this card last night for my Mother-In-Law to go along w/her 4th of July hostess gift.

I used my Mixed Media stamp and die set to make my doll, who I "dressed" in blue and red. I even added a little lace trim at the bottom of her dress. I used the Elizabeth Craft Rose and Four Bows dies to make my red and blue roses and to add a little extra dimension to my red ribbon. I use the Pride D sheet of Authentique's Pride 6x6 pattern paper pad, because it had mini patriotic posters and postcards. The music sheet background is also from the same paper pad, but since this card is a sheet of 8.5x11 folded, I used to sheets to cover the front. I'm hand delievering the card, so I ok w/it being large than normal.


I like how the card turned out so much that I'm tempted to keep it, but no... it's meant for my MIL and that's who it going to get it :)

Thanks for stopping bye.  Have a safe and fun weekend.