Hello crafty friends,
Quick post to announce the winner of my Holiday 2016 card series contest... Denise Bryant
you are the winner! Thank you for 1) subscribing to my blog and 2) commenting on every post. More details later today.
Tuesday, December 20, 2016
Friday, December 16, 2016
Holidays 2016 - Series End
Hello crafty friends,
Today is the last day for this Holiday Series. Even though I got sick during it, it's been so much fun. Thank you for helping me celebrate the season. Here are the last few cards in my stash:

This card was easy, but took time, because I die cut those small flowers and glued them piece by piece onto my pattern paper card front.

I fell in love with this snowman tossing penguins stamp and ended up ordering it from Europe! Surprising the shipping was not an issue ($5)... lets face it, that's less than some pretty big online crafty store we all know and love. By the way... I stamped the image and cut it out using my ScanNCut2.


On these last two cards I used another digital stamp from justMEdigitalstamps called Snow Buddies.
Well, that's it. I will leave the contest open until Sunday night... 8pm CST. I will draw a winner and announce it on Monday... Good luck crafty friends.
There will be a GIVEAWAY at the end of the series (Dec 16th), I will randomly pick one lucky person to win... here are the rules:
1. Comment on EVERY posts.
2. Become a follower of my blog.
Nice, but not required... use the FIND ME links to find and follow me on any of these: Facebook, Instagram, YouTube and Google+. THANKS!
Thursday, December 15, 2016
Holiday 2016 - Better Not Pout
Hello crafty friends,
Tiny Santa is in the house today, so you better not pout.


I used several of the Santas from Clearly Besotted's Santa Baby stamp set and some of the parts from Lawn Fawn's Ready, Set, Snow stamp and die sets. Kept the cards pretty basic, letting the Santas take center stage. Thanks for stopping bye, until next time... take care.
There will be a GIVEAWAY at the end of the series (Dec 16th), I will randomly pick one lucky person to win... here are the rules:
1. Comment on EVERY posts.
2. Become a follower of my blog.
Nice, but not required... use the FIND ME links to find and follow me on any of these: Facebook, Instagram, YouTube and Google+. THANKS!
Wednesday, December 14, 2016
Holiday 2016 - Bah Humbug
Hello crafty friends,
Today's card is one of my favorites. It doesn't have cute kitties or bears or even a penguin... it has only one big red grumpy bird and I LOVE him, because I can totally relate. The Holidays isn't always a happy time for everyone. It can be emotionally, physically and mentally exhausting for many people. This card is for them... my fellow grumpies

The bird is a digital from Gerda Steiner Designs called Upset Bird, I tried to get a link, but couldn't find him. Well, two more post to finish tonight and I can go to bed. Thanks for stopping bye, until next time... take care.
There will be a GIVEAWAY at the end of the series (Dec 16th), I will randomly pick one lucky person to win... here are the rules:
1. Comment on EVERY posts.
2. Become a follower of my blog.
Nice, but not required... use the FIND ME links to find and follow me on any of these: Facebook, Instagram, YouTube and Google+. THANKS!
Tuesday, December 13, 2016
Holiday 2016 - Newton Returns
Hello crafty friends,
Today's card features Newton from the Ornamental Newton and Newton's Curious Christmas stamp sets. The Merry Christmas and a Happy New Year sentiment is a die set by Impression Obsession.
This card is very glittery and for those who know me, know that I don't like glitter. At least, I don't like the kind of glitter that falls of decorations and cards. The glitter I use comes from one of two places... glittery card stock that you can run your hand across and not pickup any glitter and glitter glues/adhesives. Both versions were used on this card:

Thanks for stopping bye, until next time... take care.
There will be a GIVEAWAY at the end of the series (Dec 16th), I will randomly pick one lucky person to win... here are the rules:
1. Comment on EVERY posts.
2. Become a follower of my blog.
Nice, but not required... use the FIND ME links to find and follow me on any of these: Facebook, Instagram, YouTube and Google+. THANKS!
Monday, December 12, 2016
Holiday 2016 - Bear with Snowman
Hello crafty friends,
Two cards today, both using a super cute bear from JustMEdigitalstamps. This guys is called Christmas bear with snowman. I so love him and love that his digital, so I can custom size him from any project I'm working on.
The first card has more of a winter theme. I used the lovely snowflake by Unity Stamps called Magical Days and some wood snowflakes I painted lilac,
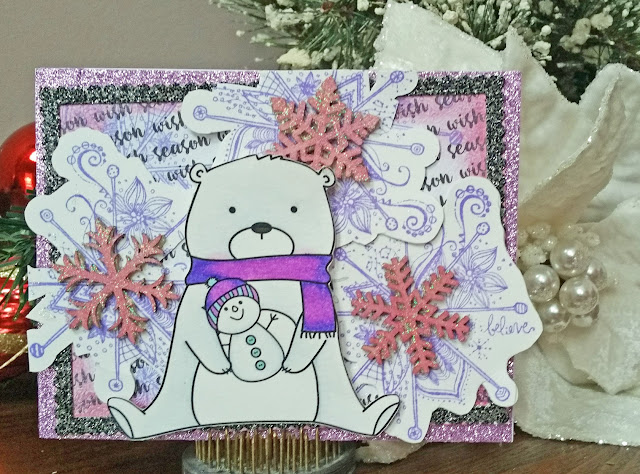
The second card is definitely a Christmas/New Years card, but I still used the Magical Days stamp in the background for a frosty look. The Merry Christmas die cut is from Impression Obsession.

I love this bear and plan on making some winter birthday cards with in Jan and Feb 2017. Thanks for stopping bye, until next time... take care.
There will be a GIVEAWAY at the end of the series (Dec 16th), I will randomly pick one lucky person to win... here are the rules:
1. Comment on EVERY posts.
2. Become a follower of my blog.
Nice, but not required... use the FIND ME links to find and follow me on any of these: Facebook, Instagram, YouTube and Google+. THANKS!
Sunday, December 11, 2016
Holiday 2016 - Feliz Navidad
Hello crafty friends,
Today's card features a Spanish sentiment... Merry Christmas in Spanish...

I used a ribbon ornament coloring page image I found on the internet. I colored the ribbons red and them covered them with red glue glitter. I outlined them with a thick black pen, because I lost most of the original outline between the coloring and gluing. I fussy cut the insides of the ornaments and turned the panel into a shaker top. My finishing touches was to add three Feliz Navidad die cuts from Elizabeth Crafts and a few sequins.
hasta la próxima vez (until next time) ... cuída se (take care).
There will be a GIVEAWAY at the end of the series (Dec 16th), I will randomly pick one lucky person to win... here are the rules:
1. Comment on EVERY posts.
2. Become a follower of my blog.
Nice, but not required... use the FIND ME links to find and follow me on any of these: Facebook, Instagram, YouTube and Google+. THANKS!
Saturday, December 10, 2016
Holiday 2016 - Ho Ho Ho
Hello crafty friends,
Still not feeling great, but I have to get this house ready for Christmas...or at the very least a somewhat less over-the-top version of Christmas. If only decorating was as easy as posting.
Last night I felt good and actually crafted... made this card in fact and i love it so much I had to bump the previously schedule card for this one :)

Those hearts you see in the background are from Your Next Stamp's Heart Ink Splatter. I love adding this stamp into projects. I cut the Hs from red and green glitter card stock on my ScanNCut2. I also used the ScanNCut2 to cut out my Copic colored Newton's Nook Ornamental Newton. I placed the middle Newton on a wobble for some extra fun. Here's a video:
I hope you like this card as much as i do... thanks for stopping bye, until next time... take care.
There will be a GIVEAWAY at the end of the series (Dec 16th), I will randomly pick one lucky person to win... here are the rules:
1. Comment on EVERY posts.
2. Become a follower of my blog.
Nice, but not required... use the FIND ME links to find and follow me on any of these: Facebook, Instagram, YouTube and Google+. THANKS!
Friday, December 9, 2016
Holiday 2016 - Word Ornaments
Hello crafty friends,
The first card I'm showcasing today using a fun set of dies from Die-Versions called Word Ornaments. Sadly they are discontinued, so I can't link to them.

I used a combination of red and green foil card stock to die cut the ornaments and fussy cut the ornaments' backing. I arranged the ornaments in a tight circle to form a wreath. My initial plan was to just use the ornament, but the card was lacking something, so I added some die cut greenery and some enamel dots.
This second card is one I also posted on the Die-Versions' blog as my Design Team project. I'm so happy that it turned out looking as elegant as i hoped it would.

I created an ornament shaker window with tiny gold stars and beads inside and a beautiful red glitter card stock Season's Greetings die cut on top. Here's a quick video of the shaker card in action...
Thanks for stopping bye, until next time... take care.
There will be a GIVEAWAY at the end of the series (Dec 16th), I will randomly pick one lucky person to win... here are the rules:
1. Comment on EVERY posts.
2. Become a follower of my blog.
Nice, but not required... use the FIND ME links to find and follow me on any of these: Facebook, Instagram, YouTube and Google+. THANKS!
Thursday, December 8, 2016
Holiday 2016 - 12 Days of Christmas
Hello crafty friends,
Today's card was super easy to make, because of this stamp set by Stampabilities called 12 Days of Christmas and the second smallest stitched square die from the Die-Version's Stitched Nesting Square die set:

I alternated between red and green ink for each of my squares. I also inked the edges of each square and pop them up with foam tape. I added a stitched die cut piece of vellum between my squares and the card front pattern paper.

I've had this stamp set in my collection for years and never used it. So it's way overdue for it's 15 minutes in the spot light. Until next time... take care.
There will be a GIVEAWAY at the end of the series (Dec 16th), I will randomly pick one lucky person to win... here are the rules:
1. Comment on EVERY posts.
2. Become a follower of my blog.
Nice, but not required... use the FIND ME links to find and follow me on any of these: Facebook, Instagram, YouTube and Google+. THANKS!
Wednesday, December 7, 2016
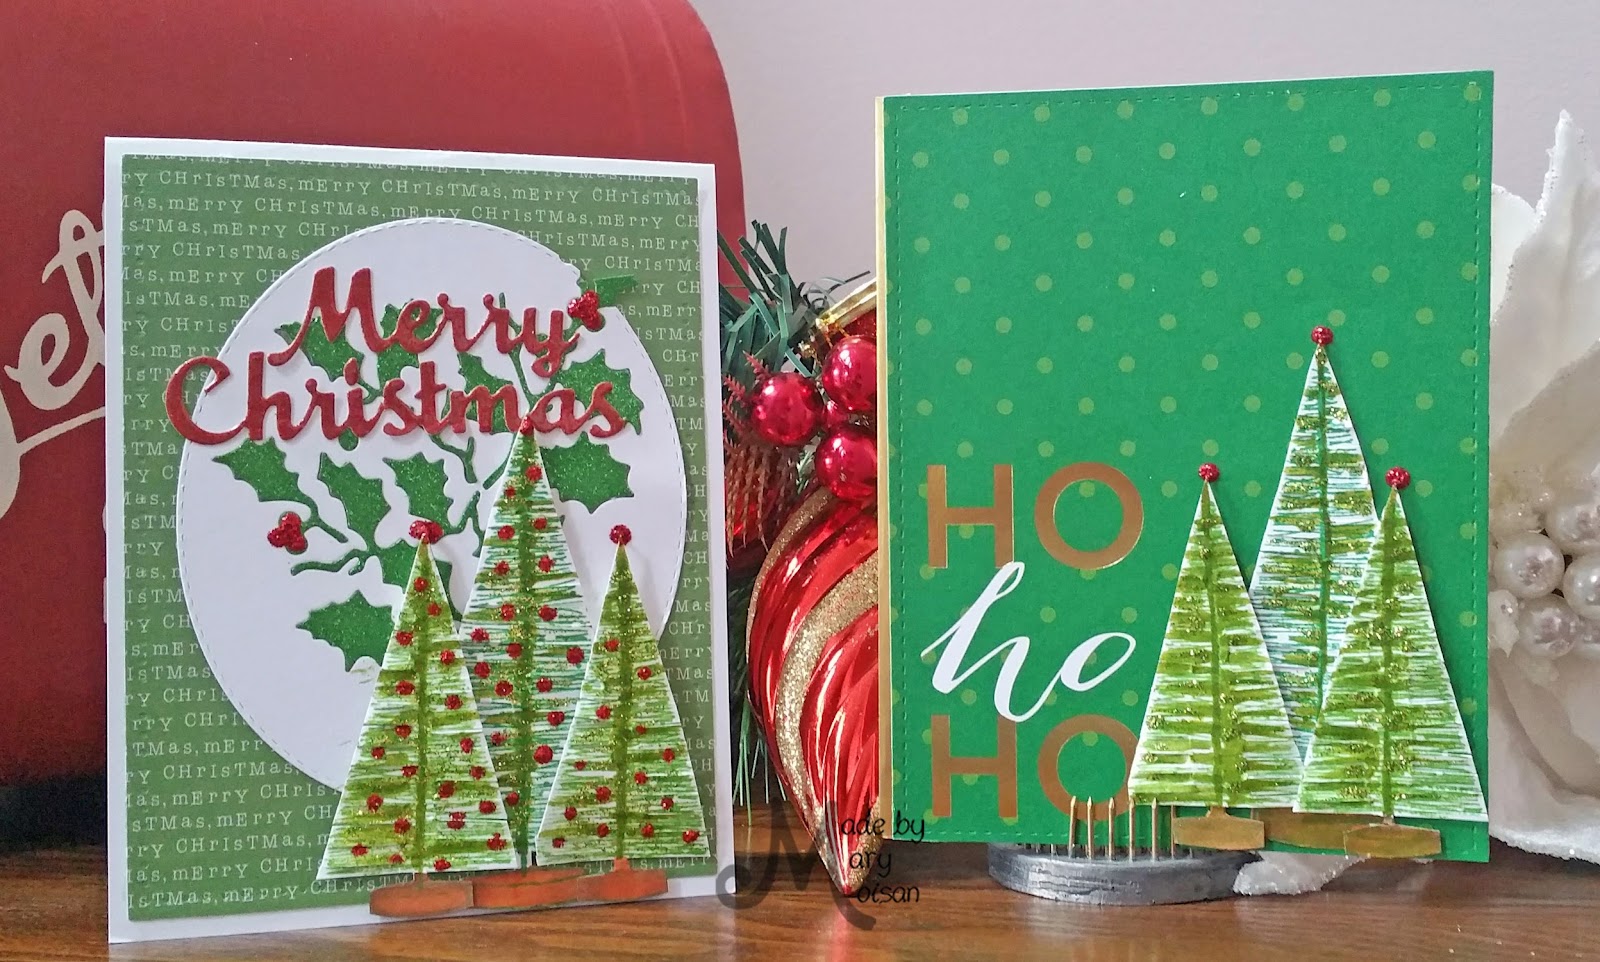
Holiday 2016 - Trees
Hello crafty friends,
Quick overdue post today, because this cold I'm currently fighting is brutal. I have no energy and haven't been in my craft room since my last post. Thankfully I had several cards already done that I can use until my next creative session.

I used the cute trees from the Hero Arts Family and Friends stamp set. There's a name for these trees, but I can't remember now.

I used the most of my pattern paper on this card... by just adding three trees and a thin strip of gold card stock.

On this card, I used three trees again, but added a die cut Holly from a Tim Holtz die set and a die cut Merry Christmas from the Die-Versions Complements Holiday 1 die.
Well, my couch and blanket are calling me, so until next time... take care.
There will be a GIVEAWAY at the end of the series (Dec 16th), I will randomly pick one lucky person to win... here are the rules:
1. Comment on EVERY posts.
2. Become a follower of my blog.
Quick overdue post today, because this cold I'm currently fighting is brutal. I have no energy and haven't been in my craft room since my last post. Thankfully I had several cards already done that I can use until my next creative session.
I used the cute trees from the Hero Arts Family and Friends stamp set. There's a name for these trees, but I can't remember now.

I used the most of my pattern paper on this card... by just adding three trees and a thin strip of gold card stock.

On this card, I used three trees again, but added a die cut Holly from a Tim Holtz die set and a die cut Merry Christmas from the Die-Versions Complements Holiday 1 die.
Well, my couch and blanket are calling me, so until next time... take care.
There will be a GIVEAWAY at the end of the series (Dec 16th), I will randomly pick one lucky person to win... here are the rules:
1. Comment on EVERY posts.
2. Become a follower of my blog.
Nice, but not required... use the FIND ME links to find and follow me on any of these: Facebook, Instagram, YouTube and Google+. THANKS!
Sunday, December 4, 2016
Holiday 2016 - Tall Snowman
Hello crafty friends,
As I sit typing this, we are getting our first snow of the season. The cats are watching from my craft room window... I wonder what they think about snow (or anything else for that matter). In honor of the falling snow, I selected this card for today's post.

I fell in love with this tall snowman when I first saw it and just had to have him. Thankfully for both my wallet and my impatient self he was a digital image from Sassy Cheryl's Decked out for the Holidays.
I printed him out and went to work on him. I used Copic markers for him and the blue background. Sorry, I didn't keep track of what colors I used. I used the Falling Snow stencil from Simon Says Stamps for the icy looking snow and a new product I picked up recently called Glitter Paste (Sugar) from BoBunny, which I absolutely love. Will have to pick up some red for Valentine heart cards :)
My finishing touch for the card was to add a grouping of die cuts at the bottom right of the card w/a fun sentiment. This card makes me smile. Don't be surprise if you see this snowman make another appearance soon. Until next time... take care.
There will be a GIVEAWAY at the end of the series (Dec 16th), I will randomly pick one lucky person to win... here are the rules:
1. Comment on EVERY posts.
2. Become a follower of my blog.
Nice, but not required... use the FIND ME links to find and follow me on any of these: Facebook, Instagram, YouTube and Google+. THANKS!
Saturday, December 3, 2016
Holiday Cards - Newton's World
Hello crafty friends,
Can you guess at what line of stamps I love to the point that I must get every release? Yes, of course, it's Newton... I just love all those kitties!
For this card I used Newton's snowman and the Newton in the Tree stamps from the Newton's Curious Christmas set and the girl from A Cozy Day in set. I created a comfy room scene with lots of Newtons.

I paper pieced the chair to match the "wallpaper" and the blanket with a pink winter pattern paper that has tiny trees and deers. I fussy cut an oval tree skirt for under the xmas tree and even gave it fringe and a small stamped Merry Christmas greeting. This card took a while, but I love how it turned out and it will go to someone who loves cats.
There will be a GIVEAWAY at the end of the series (Dec 16th), I will randomly pick one lucky person to win... here are the rules:
1. Comment on EVERY posts.
2. Become a follower of my blog.
Nice, but not required... use the FIND ME links to find and follow me on any of these: Facebook, Instagram, YouTube and Google+. THANKS!
Thursday, December 1, 2016
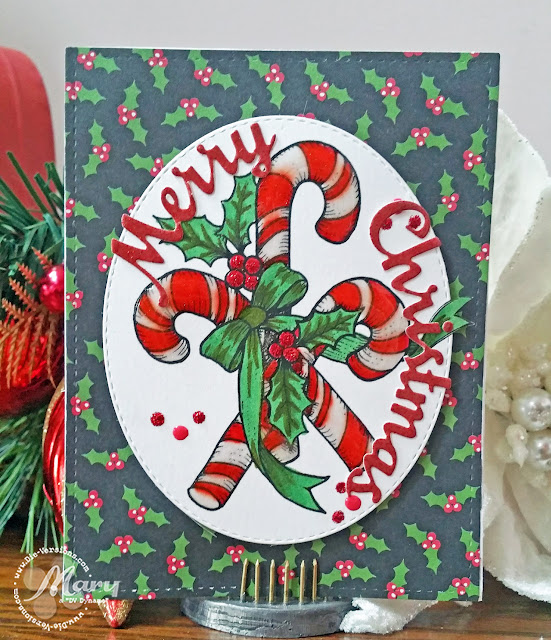
Holiday 2016 - Merry Christmas Candy Canes
Hello Crafty Friends,
Today's card is one I'm also posting on the Die-Versions' blog as my Design Team project. This die is my most reached for Christmas die... in my opinion, along with the Complements - Everyday die it's one of the best dies in the whole Die-Versions line. I talking about the Complements - Holiday 1 die, which is actually several words dies in one... and it's currently on SALE!
The Merry Christmas on the card below in just one of the words in this die. This card is a good example of a card made with very few items. One die, one image (the candy canes image is a digital stamp form Power Poppy Stamps, so it was extremely inexpensive... $1 actually), 1 6x6 sheet of pattern paper and 1 piece of white card stock (actually i used watercolor paper).
I'm going to start working on my December daily now... bye.
I'll be doing a GIVEAWAY at the end of the series, I will randomly pick one lucky person to win... here are the rules:
1. Comment on EVERY posts.
2. Become a follower of my blog.
Today's card is one I'm also posting on the Die-Versions' blog as my Design Team project. This die is my most reached for Christmas die... in my opinion, along with the Complements - Everyday die it's one of the best dies in the whole Die-Versions line. I talking about the Complements - Holiday 1 die, which is actually several words dies in one... and it's currently on SALE!
The Merry Christmas on the card below in just one of the words in this die. This card is a good example of a card made with very few items. One die, one image (the candy canes image is a digital stamp form Power Poppy Stamps, so it was extremely inexpensive... $1 actually), 1 6x6 sheet of pattern paper and 1 piece of white card stock (actually i used watercolor paper).

I'm going to start working on my December daily now... bye.
I'll be doing a GIVEAWAY at the end of the series, I will randomly pick one lucky person to win... here are the rules:
1. Comment on EVERY posts.
2. Become a follower of my blog.
Nice, but not required... use the FIND ME links to find and follow me on any of these: Facebook, Instagram, YouTube and Google+. THANKS!
Tuesday, November 29, 2016
Holiday 2016 - Dogs and Cats
Hello Crafty Friends,
My sister-in-law mentioned the lack of dogs in my Halloween series, so I figured I better include some cards with dogs in this series. Here's the first of several dog cards... and a cat card.

I used the same technique on both cards. stamped the image onto watercolor paper, water colored around the stamped image with my Zig Watercolor Brush Pens using the same two colors. The stamps are both by Inkadinkado.


These were super easy fun cards to make.
I'll be doing a GIVEAWAY at the end of the series, I will randomly pick one lucky person to win... here are the rules:
1. Comment on EVERY posts.
2. Become a follower of my blog.
Nice, but not required... use the FIND ME links to find and follow me on any of these: Facebook, Instagram, YouTube and Google+. THANKS!
Sunday, November 27, 2016
Holiday 2016 - Penguin with Snowman Balloon
Happy Holiday Crafty Friends!
Since I LOVE penguins, I thought it would be fitting to start my Holiday Card Series with a penguin.

This cute penguin with snowman balloon is a digital stamp from JustMEdigitalstamps. I created the tag by die cutting the Scalloped Banners die from Avery Elle and then die cutting the Storybook 1 die from Pretty Pink Posh in the center. Added some pattern paper on the back panel of the tag, because I made it so it opens like a card by using a folded piece of white card stock and not die cutting the fold when I cut the scalloped shape.

On the card I used the same pattern paper twice... on the card's backgound and on the tags front. This time I added a tiny circle tag with a "hi" greeting on the penguin's hand (penguins hands/wings are actually called flippers and are used to propel themselves through water.)

I hope you have enjoyed the first post of the series. I'll be doing a GIVEAWAY at the end of the series, I will randomly pick one lucky person to win... here are the rules:
1. Comment on EVERY posts.
2. Become a follower of my blog.
Nice, but not required... use the FIND ME links to find and follow me on any of these: Facebook, Instagram, YouTube and Google+. THANKS!
Saturday, November 26, 2016
Goodbye Fall/Halloween
Hello crafty friends,
I finished packing up all the Halloween and Fall decorations yesterday. Now waiting for the guys to take the bins downstairs and starting bring up Christmas and Winter stuff.
I gave away some of my Halloween and Fall stuff this year... as much as I LOVE this season, I'm at a point where extreme decorating just doesn't happen anymore. So I gave my brother some stuff and I sent more stuff home w/my Mom and Sister.
So that brings me to the last Fall card of the year on this blog... a Thanksgiving card.


I hope you Thanksgiving day was full of love ones and good food. Our was definitely!
I'll be back tomorrow with my first Holiday 2016 card. Until tomorrow :)
I finished packing up all the Halloween and Fall decorations yesterday. Now waiting for the guys to take the bins downstairs and starting bring up Christmas and Winter stuff.
I gave away some of my Halloween and Fall stuff this year... as much as I LOVE this season, I'm at a point where extreme decorating just doesn't happen anymore. So I gave my brother some stuff and I sent more stuff home w/my Mom and Sister.
So that brings me to the last Fall card of the year on this blog... a Thanksgiving card.


I'll be back tomorrow with my first Holiday 2016 card. Until tomorrow :)
Thursday, November 17, 2016
It's beginning to look...
Hello crafty friends,
Yes, it's beginning to look a lot like Christmas in my craft room. I'm been making my list and checking it twice to make sure I use all my lovely Holidays stamps, dies and papers. Here's a peek at just a few of the goodies I'm beworking playing with:
I had so my fun making different (not all the same) cards for Halloween, that I've decided to do the same for Christmas. MyChristmas Holiday Card Series will start after Thanksgiving on Saturday, Nov 26th.
Once again I'll have a prize for the person who comments on all my posts and follows me. More details coming soon.
Yes, it's beginning to look a lot like Christmas in my craft room. I'm been making my list and checking it twice to make sure I use all my lovely Holidays stamps, dies and papers. Here's a peek at just a few of the goodies I'm be

I had so my fun making different (not all the same) cards for Halloween, that I've decided to do the same for Christmas. My
Once again I'll have a prize for the person who comments on all my posts and follows me. More details coming soon.
Monday, October 31, 2016
and the Winner is
Hello crafty friends,
I'm here to announce the winner of my first ever Halloween Card Series. Congratulations Denise Bryant... you won these two stamps set. I will send you an email in a few minutes.

Since there were only two ladies who posted a comment on every post... Denise and Heidi. I decided to find something special for Heidi also.
Thank you ladies and everyone else who took the time to leaving me lovely comments. I'll be back next week as I start my next card series... Christmas :)
Sunday, October 23, 2016
Halloween Card 11, 12 and 13 - Grand Final
Hello craft friends,
I have to admit I'm forcing myself to write this post. I truly enjoyed this series, but a death in the family has dull my excitement. I glad I got these cards done last weekend and that all I needed to do was photograph them and create the post.
Card 11, started w/a digital stamp from La La Land... Zombie Marci. Isn't she the cutest zombie ever? I colored her on mixed media paper with my zig watercolor brush pens. Next I did a little fussy cutting to get her into the Peek A Boo Wonky Windows die cut frames from MFT. I added a sticker spider to finished the card.

Card 12, is a shaker card. I die cut the window from chunky black glitter paper using the MFT Stitched Arch Stax dies. The cat was die cut from the same glitter paper using the Cheery Lynn Whimsical Halloween Cat die. The ears, eyes and nose from white glitter paper.

Card 13, has another digital stamp from La La Land... Dia De Los Muertos Marci. Sugar skull Marci is just as cute as zombie Marci. This card was inspired by the background pattern paper and it's curvy Happy Halloween. I wanted something that would fit into that spot on the card and the dress on this Marci was perfect. I added an orange glitter die cut of Die-Versions' Oriental Fan die behind Marci for an added pop of color.

Here's a fun photo of all the cards in the series. Let me know which card was your favorite.

and now, here's a photo of my giveaway...

You have until next Sunday night to comment on EVERY post for a chance to win these two stamp sets from Joy Clair. I will pick one winner using a random number generator on Sunday night. Good luck and thank you all so much for stopping bye.
Thursday, October 20, 2016
Halloween Card 11 - So Corny
Hello crafty friends,
life sometimes gets in the way of crafting. So I'm back a day late with the next installment in the series. Today's card is very cute (if I'm allow to say) and I hope you love it.
These corny guys and gals are from Your Next Stamp... the set is called So Corny and I fell in LOVE w/them as soon as I saw them.
 I used my Zig Watercolor Brush Markers to color them on watercolor paper. Are you ready to see the inside?

I found the prefect sentiment in my stash of old stamps. Sorry, it wasn't in any packaging, so I have no idea who's it by, but it was a clear stamp. I'll be back this weekend with the final post in the series and a photo of the giveaway.
GIVEAWAY RULES:
To make this series more fun... i'm doing a GIVEAWAY? At the end of the series, I will randomly pick one lucky person to win, so make sure you comment on EVERY post in order to be eligible.
I'm not sure what you will win yet... I'll have to look thru my stash for something good :)
life sometimes gets in the way of crafting. So I'm back a day late with the next installment in the series. Today's card is very cute (if I'm allow to say) and I hope you love it.
These corny guys and gals are from Your Next Stamp... the set is called So Corny and I fell in LOVE w/them as soon as I saw them.


I found the prefect sentiment in my stash of old stamps. Sorry, it wasn't in any packaging, so I have no idea who's it by, but it was a clear stamp. I'll be back this weekend with the final post in the series and a photo of the giveaway.
GIVEAWAY RULES:
To make this series more fun... i'm doing a GIVEAWAY? At the end of the series, I will randomly pick one lucky person to win, so make sure you comment on EVERY post in order to be eligible.
I'm not sure what you will win yet... I'll have to look thru my stash for something good :)
Monday, October 17, 2016
Halloween Card 10 - Open Pumpkin
Hello crafty friends,
I'm so enjoying making the cards for this Halloween series, so I hope you are enjoying them as well. Normally, I make 10 of the same Halloween card to send to family. This is the first time I've made so many different cards for one occasion... and its been so my fun.
Today's card uses a very old stamp by Judi Kins I got years ago at a stamp resale fair.

I was going to create a Halloween scene inside the pumpkin, but I had just open my MFT order, which contained the Sending and Hugs die words and they called to me. So I used them along w/the Halloween word die from a Little B Halloween word die set. I die cut all three words from glitter cardstock. Added some black enamel to the pumpkins eyes and nose and on all four corners of the card. They aren't perfectly round (have to practice some more), but they are ok on a Halloween card. I added some leaves to the top of the pumpkin and because I felt something else was needed I carefully lifted the pumpkin and added three rows of thin washi tape.
I hope I have inspired you to get some your old stamps and dies out and make some cards of your own. I'll be back on Wednesday w/a new project. Bye!
GIVEAWAY RULES:
To make this series more fun... i'm doing a GIVEAWAY? At the end of the series, I will randomly pick one lucky person to win, so make sure you comment on EVERY post in order to be eligible.
I'm not sure what you will win yet... I'll have to look thru my stash for something good :)
Saturday, October 15, 2016
Halloween Card 8 and 9 - Pattern Paper
Hello crafty friends,
I found some cute word art pattern papers in an old 6x4 Halloween pad and decided to make them the foundation for my next two cards.

On the orange card, since it mentions ghosts, witches and spiders, I added some of those die cut shapes. The Spider and Witch are from Die-Versions. The Ghosts are from Impression Obsession. I die cut the spider and witch from black glitter paper and backed them w/white cardstock, so they had a white shallow. Did the same for the ghost w/silver glitter paper. The spider webs were made with a punch from black cardstock.

On the green card, I used the same spider web punch, but just on one side. Added some black twine and some Stickles to the bubbles. I kept this version very simple to show that you don't need a lot of products to make a cute card.

I hope you have enjoyed today's project and that it inspires you to make some of your own. I'll be back on Monday w/a new project. Bye!
GIVEAWAY RULES:
To make this series more fun... i'm doing a GIVEAWAY? At the end of the series, I will randomly pick one lucky person to win, so make sure you comment on EVERY post in order to be eligible.
I'm not sure what you will win yet... I'll have to look thru my stash for something good :)
Thursday, October 13, 2016
Halloween Card 7 - Pumpkins
Hello craft friends,
Quick post today, because I left it for last minute.

Aren't those pumpkins cute? I used a Tim Holtz stencil and distress inks for the background. Here's a close up:

This set of pumpkins is an older one, but I still love them. I hope you have enjoyed today's project and that it inspires you to make some of your own. I'll be back on Saturday w/a new project. Bye!
GIVEAWAY RULES:
To make this series more fun... i'm doing a GIVEAWAY? At the end of the series, I will randomly pick one lucky person to win, so make sure you comment on EVERY post in order to be eligible.
I'm not sure what you will win yet... I'll have to look thur my stash for something good :)
Tuesday, October 11, 2016
Halloween Card 6 - Three Amigos
Hello crafty friends,
You are going to love today's card. I had the idea for it while driving home from work yesterday and after dinner sat down to create it. I'm so happy with how it turned out.

Here's a close up...

I started by searching though my pattern papers for background elements like the house, the spooky trees and the moon. I paper pieced the background and added a dark green hill. Next I stamped and colored my Mama Elephant Three Amigos. I was going to stamp Trick or Treat (3 words, 3 signs), but ended up searching my stash for small Halloween sentiments stamps that would fit their signs instead. I meant to give each character hat costumes, but completely forgot... LOL
I love this stamps set and especially love using these cuties in unexpected ways. They just go with everything. I hope you have enjoyed today's projects and that it inspires you to make some of your own. I'll be back on Thursday w/a new project. Bye!
GIVEAWAY RULES:
To make this series more fun... i'm doing a GIVEAWAY? At the end of the series, I will randomly pick one lucky person to win, so make sure you comment on EVERY post in order to be eligible.
I'm not sure what you will win yet... I'll have to look thur my stash for something good :)
Sunday, October 9, 2016
Halloween Card 5 - Wreaths
Hello crafty friends,
Wreaths are very popular lately, so I brushed the cobwebs off my wreath die and created these two cards. One Halloween and the other Fall. A wreath die or stamp makes the prefect foundation for any card. For my wreaths I used an Impression Obsession die.

On my Halloween card, I die cut the wreath from back card stock. I used three tombstones from the Your Next Stamp graveyard set, ghost from the Impression Obsession Mini Ghost set, and the word Halloween from the Little B Halloween Phrases set.

Here's a closed up showing how glittery the ghost are after I used by clear glitter marker on them.

On my Fall card, I die cute the wreath from brown card stock. Added some small punched flowers w/glitter dots in the center. The large flower is from Cheery Lynn Sunflower die. I used a button for the center.

I hope you have enjoyed today's projects and that it inspires you to make some of your own.
To make this series more fun... i'm doing a GIVEAWAY? At the end of the series, I will randomly pick one lucky person to win, so make sure you comment on EVER post in order to be eligible.
I'm not sure what you will win yet... I'll have to look thur my stash for something good :)
I'll be back on Tuesday w/a new project. Bye!
Subscribe to:
Posts (Atom)